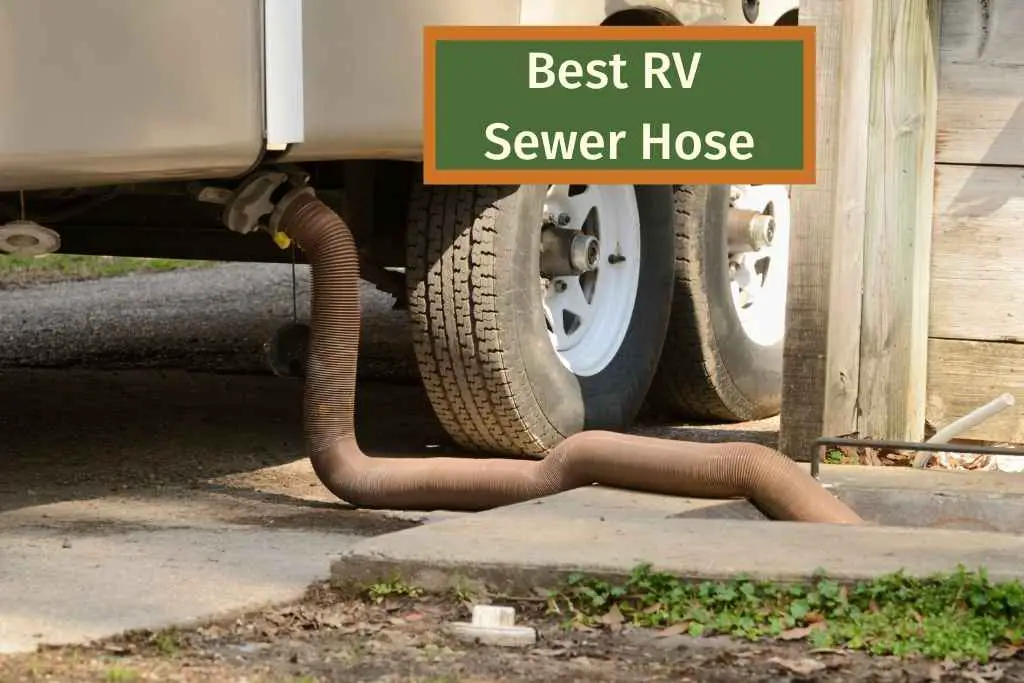
For most RVers emptying the black and gray tanks is the worst part of every trip. To try and make this process as easy as possible you want the best sewer hose you can buy.
I have reviewed and researched all RV sewer hoses available and picked the best 6 to make sewage disposal as painless as possible.
An RV sewer hose is a hose that connects to the sewage outlet on your RV and flushes the waste out into the sewer drain. It’s important that this bit of kit is durable and reliable because you most definitely don’t want any spills from this process.
Picking the right hose makes your RVing life so much easier and more hygienic. Each hose chosen in this review has its own highlights so choose the one that fits your needs the most.
RV Sewer Hose – Top Picks
[elementor-template id=”2132″]
6 Best RV Sewer Hoses Review
Valterra Dominator RV Sewer Hose – Best Overall

![]()
The Valterra Dominator is our favorite pick. It has 2 collapsible 10 foot hoses that connect easily to provide a 20 foot sewer hose. All fittings can rotate and the kit includes a transparent elbow sewer fitting so you can see when the tank is empty. 4 drip caps are also included so you don’t have to worry about leakage when stored. With the 90-degree adapter, you can choose the hose direction and assure it will stay attached to your camper throughout the draining process.
Each hose collapses from 10 feet to 39 inches for convenient storage. Use a single hose for dump station convenience, or attach the two hoses for a full 20-foot drain to your desired location.
The bayonet hook fittings are easy to use and secure enough to ensure a leak proof system.
The dominator is 23mil thick so it easily keeps its shape and avoids kinks when in use and is durable enough to prevent leaks.
The material of the hose remains functional and flexible in cold temperatures down to -20 degrees Fahrenheit, making it perfect for all-season camping trips.
This hose is amazing! It stays in the position that you stretch it to so you don’t end up in a sewer hose entanglement at the end of use. Gag.
The only downside, is that in order to clean the Valterra thoroughly, it must be stretched to its full 15 foot length, which can be hard to handle. If it is not extended and rinsed wastewater can be trapped in the ‘pleats’.
Pros
- Durable material
- Comes with all the fittings
- Secure Bayonet fittings
- Flexible and collapsible so easy storage
- Swivel fittings make hookups easy
- Tight seal
Cons
- Can be hard to clean – needs to be stretched so dirt doesn’t get stuck in the creases.
Lippert Waste Master RV Sewer Hose – Best For Easy Installation

![]()
The Lippert RV Sewer Hose is the only one in the review with the CAM Lock connector, so it is guaranteed to be leak proof.
It’s also the easiest to clean out of all the hoses as the coil is on the outside so the inside is smoother so less waste can get trapped.
The 20 foot hose is made from material has in built UV protection and compresses down to 5 foot 6 inches.
The outlet nozzle is permanently-connected with an easy-grip handle, an integrated shut-off valve and a clear view port so you can see when your tanks have been emptied.
This system is super easy to use and once you use it you probably won’t even consider another type.
Unfortunately there have been a few cases of the hose breaking, so treat this one with care.
Pros
- CAM lock connector for leak-free disposal
- Flexible
- Collapsible
- All fittings included
- Swivel fittings make hookups easy
- Leak proof seal
Cons
- The hose isn’t as durable as other versions
Titan Premium RV Sewer Hose Kit – Best For Durability

![]()
The Titan premium RV Sewer hose kit is a great sturdy hose! The 20 foot hose come as two 10 foot rugged TPE hoses that easily connect together or can be used individually. This is great if you are in two minds over which length to get.
The TPE material the hoses are made out of is really strong, it will prevent leaks and is uncrushable – which in a sewer hose is a real bonus. It can also withstand extreme temperatures.
The bayonet hook fittings are really sturdy and one of the easiest to connect that we’ve tried.
If durability and length are your main concerns then I would highly recommend the titan sewer hose.
This kit comes with everything, so you won’t need to worry about buying any add ons.
The only downside is that it doesn’t collapse as well as other brands, you will have to consider the size of this hose for storage.
Pros
- Well built sturdy hose, will last a long time
- 2 x 10 foot hoses
- Easy to use bayonet fittings (extra large grip)
- Swivel fittings make hookups easy
- Tight seal
Cons
- Not very collapsible – more storage room needed.
Camco RhinoEXTREME RV Sewer Hose Kit – Best For Flexibility

![]()
The Camco RhinoEXTREME is a great sewer hose if flexibility is what you’re after!
It’s made with TPE to protect against pinhole leaks, dents, rust or crushing, so it’s pretty durable.
The kit includes all the locking rings, caps and a transparent elbow adaptor, so you don’t need to worry about buying any extras.
The bayonet hook fittings has four prongs for a secure fit, and a transparent elbow fitting so you can see when your tank is empty. The best part of this hose is that it’s flexible enough to fit into a standard bumper.
The fittings can be a bit loose, so before you first use this, refit everything making sure you have as much of the hose into the fittings as possible so it doesn’t come loose.
Because of it’s flexibility this hose can feel thinner than the more durable sets, however it is still strong enough to withstand normal usage.
Pros
- Flexible and collapsible so easy storage
- Comes with all the fittings
- Secure Bayonet fittings
- Swivel fittings make hookups easy
- Tight seal
Cons
- Can feel more flimsy than other options
Camco Revolution Sewer Hose Kit – Best For Price

![]()
If money is your biggest concern then the Camco Revolution sewer hose kit is for you. It’s an all in one kit so you don’t need to buy any extras, it even includes a transparent elbow so you can see when your tank is empty.
The 20 foot hose comes as two 10 foot hoses that can be connected, everythings easy to use and store.
It’s made out of heavy duty HTS vinyl so it’s pretty durable, the fittings swivel 360 degrees for easy connecting. The hose compresses down for easy storage and will fit into a standard 4-inch square bumper.
We like this hose because it is heavy duty, strong, and the fittings seal very tight. It does everything you’d want a sewer hose to do.
Pros
- Durable
- Collapsible
- All fittings included
- Swivel fittings make hookups easy
- Tight seal
Cons
- Doesn’t retract as short as a lighter hose
- Difficult to reach the full 20′ length because the hose just wants to retract
- Fitting are somewhat large and difficult to store
How to Pick the Best RV Sewer Hose for You – Buying guide
Buying a sewer hose can be a messy business, so we’ve compiled the ultimate buying guide for you so you don’t have to get your hands dirty.
The sewer hose is used to remove the sewage that’s accumulated in your RVs holding tank and deposit it in the sewage system.
It’s not the most enjoyable job, but having the right sewer hose makes it easier and less of a hassle.
Our in depth buying guide will help you pick the right RV septic hose for you, to make waste removal from your RV quick and painless.
Storage Space
All of the sewer hoses in the review are portable, so they don’t stay connect to the RVs sewer outlet permanently.
However, when you do detach it you will need somewhere to store it. You don’t want it anywhere near the inside of your RV. Luckily most RVs have underneath storage compartments, so you can store your hose in the compartment nearest to the sewer outlet.
Before you purchase a septic hose make sure that you know how big it will be when it collapses, so you will safely have somewhere to store it on your RV.
Hose Thickness and Length
The length of the hose you want will depend on the length of your RV and how close you can get the sewer outlet to the dumping station.
Typically sewer hoses come in lengths between 10 and 20 feet, these lengths are usually more than enough for the average RVer. If you need a longer one (or are nervous about parking so close to the dumping station) you can always attach two hoses together. Beware that the longer the hose is the harder it is to handle.
Every dumping station is different so your proximity to the sewer drain may change depending on which station you are using.
If you are still struggling to decide which length hose to get, then a 20 foot sewer hose is your best bet. It should be long enough to reach the sewer drain from a comfortable distance in most situations.
Remember you can always add an extension hose to give you a bit more length if you need it, these typically come in 10 foot lengths.
The thickness of your sewer hose is just as important as the length, you want to make sure that it’s flexible but durable.
Sewer hoses thickness are measured in millimeters and typically come in the range of 18 to 25 mm.
Ideally you want a thicker hose, especially if you’re a full-timer or use your RV a lot. The thicker the hose then the quicker the whole ‘dumping’ process will be, so if you are a regular ‘dumper’ 🙂 then a thicker hose girth is for you.
Unfortunately as the hoses get wider the price tends to get higher.
The thicker the hose walls the less likely they are to break and leak, which is not a good thing for any hose – especially a sewer hose.
The more you move it, connect and disconnect etc the more wear and tear on the hose.
You will get a much longer life span from a thicker hose.
Extreme temperature is another factor that will affect the longevity of your septic hose, the heat and cold of extreme climates will contract and expand the lining, thus a thicker lining would be beneficial. Make sure that you store the hose where it isn’t subjected to extreme temperatures if possible.
UV from the sun can also degrade the hose, so make sure to keep it away from direct sunlight as much as possible.
Hose Flexibility
Sewer hose flexibility is another important factor to consider, the more flexible the hose the better as there will be less chance of breaking it.
Sometimes the configuration of the dumping station will mean that you have to set your sewer hose up in a weird way, the more flexibility you have then the more layout options you have. You should alway try and give the hose as much of a straight path as possible to avoid blockages.
You should always set your hose up on a sewer hose support, to help protect it and to maintain a downward slope from the RV to the drain.
With that being said, don’t compromise on the quality of material in favor of flexibility.
Budget
You definitely don’t want to skimp on an RV sewer hose, it could end in disaster! But you don’t want to pay over the odds either. You can get a decent hose in the range of $40 to $150, all of the hoses in our review fall into this range.
Set your budget according to what your preferences are and stick to it.
Flow
As you can imagine the flow rate is the measurement of how quickly the waste will travel through the sewer hose into the drain.
You want a hose that will provide continuous flow. This means that it has to be wide enough to accommodate waste of all sizes without blocking. You also want a higher flow rate, as this is probably the worst part of RVing, so you want to spend the least amount of time possible doing it.
To avoid blockages and get the job done quickly, you want a hose that’s at least 4 x 4 inches, this is probably the most common size. However you can go bigger if you think you’ll need it.
Moving on now, because I can’t get the image of ‘flow rate’ out of my head.
Ease of Use
Because this is quite literally a crappy job, you also want your hose to be easy to set up and take down. Accessories like adapters, macerators, flush hoses and supports will make life easier.
Look for convenience as a priority, and get a sewer hose that comes complete with all the accessories, so you don’t have to buy separate things. Our top picks are complete kits with universal fittings that will fit all the different sewage pipes.
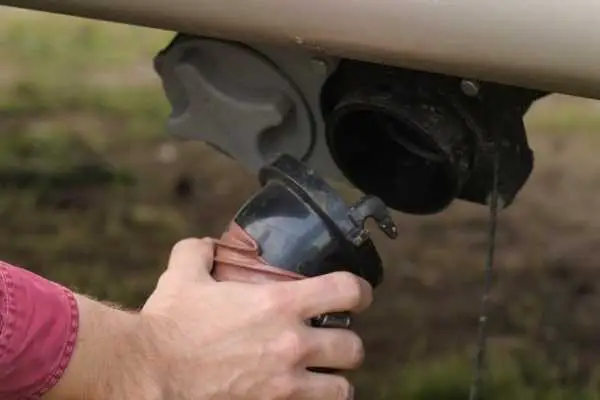
You also want a hose that’s easy to attach and detach, as this part can get messy. Hoses with a see through elbow may seem gross at first but it will let you see when your RV tank is empty without undoing all the fittings.
Frequency of Use
Like we mentioned before the more you use your RV the more robust sewer hose you’re going to need. If you’re a full-timer then it’s important to get a heavy duty RV sewer hose. If you only use your RV occasionally for seasonal or weekend trips then a standard hose will be fine.
Your RVs Grey or Black Tank Outlet Size
If you have a newer model of RV then the outlet size shouldn’t be an issue as they are all now standardized.
But, if you have an older model then you will need to check the compatibility of your outlet size with the sewer hose. Make sure that the hose you get can adapt to different size outlets.
Materials
The thicker the hose walls the less likely they are to break and leak, which is a good thing for any hose – especially a sewer hose.
You will get a much longer life span from a thicker hose.
Extreme temperature is another factor that will affect the longevity of your septic hose, the heat and cold of extreme climates will contract and expand the lining, thus a thicker lining would be beneficial. Make sure that you store the hose where it isn’t subjected to extreme temperatures if possible.
UV from the sun can also degrade the hose, so make sure to keep it away from direct sunlight as much as possible.
One of the best materials for your RV sewer hose is vinyl, it’s durable and can withstand most temperature and humidity conditions. Vinyl is also scratch and puncture resistant and will retain its shape even if it’s run over.
Fitting Type
There are three different types of fittings for RV black water hoses – Slip fitting, bayonet hook fitting and CAM-Lock connectors. It’s important to know a little bit about them and which one will work best for you.
Slip Fitting
The slip fitting is a classic fitting type for a sewer hose, they tend to be a bit outdated now, but are probably the simplest locking mechanism.
Slip fittings are still used on a lot of RV sewer hoses, they work by sliding the sewer hose over your RVs sewer outlet and fastening it with a clamp or a locking mechanism.
You will need to make sure that the clamp is tight over the hose to prevent leaks, or even worse the hose coming off mid dump!
The clamp will also degrade the end of the hose over time, making it more and more likely for an accident to happen. Make sure that you replace your slip fitting hose at the first sign of damage, the last thing you want is to get covered in sewage.
Pros
- Easy to fit
Cons
- Will need a separate clamp
- Can damage the hose over time
Bayonet Hook Fitting
Bayonet hook fittings are the most common fittings out there, you can easily spot these types of RV sewer hoses by the solid plastic piece on the end that has two or four small hooks on them.
Sewer drain pipes now have small nodules on the outside pipe, you can twist the bayonet hook fitting to secure it in place. Once these are wisted on and secure they provide a watertight seal.
The only issue with this fitting is that it’s made from plastic which can break, if you’re not careful with it.
Pros
- Easy to use and fit
- Secure seal
Cons
- Plastic can break
CAM-Lock Connector
CAM-Lock connector fittings are as secure as you’re going to get, as with everything it comes with a price.
The CAM-Lock fittings are industry standard, and used in the sewage industry and fire trucks. They are “compression” fittings that work by compressing the seal ring by using the two locking mechanisms on each side. This produces a watertight seal.
If you are concerned about sewage leaking then this is the type of fitting that you want.
Pros
- Leak proof – waterproof seal
- Easy to Use
Cons
- Expensive
What RV sewer hose accessories do I need?
Before we run through the how to guide, I thought it would be best to run through a few accessories that you’ll need to make life easier.
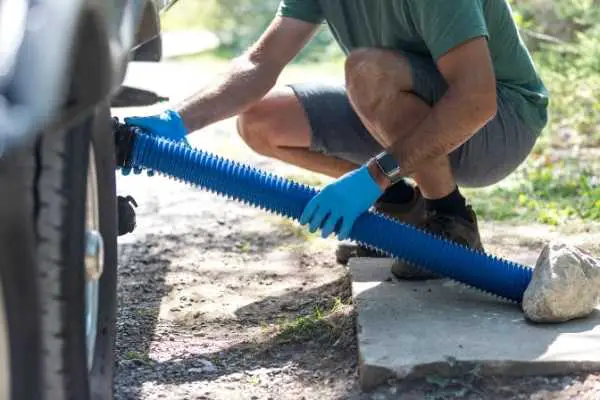
You don’t want to touch any part of this process with bare hands – trust me, it’s not pretty. Latex or plastic gloves are a must. You also want quality ones, so they don’t rip easily.
The sewer hose cradle helps to protect the hose by keeping it off the ground. The set comes with varying heights to ensure that the sewer hose is always on a downward slope, which means the waste can flow easier into the drain. This also prevents blockages which is only a good thing.
Transparent Sewer Hose Adaptor
I know it makes me queasy just thinking about what’s flowing through the sewer hose never mind seeing it. But, using a see through elbow adaptor lets you see when your tanks are empty and therefore can prevent a face full of excrement if you remove the hose too early.
Another lovely image for you (I hope you’re not reading this on your lunch break), a macerator system is a motorized grinder that chops up the larger waste into a slurry. It’s like a waste disposal system that you have at home, but for sewer.
The macerator system usually includes a pump, and is best for sites where there is no dumping station. The slurry can be pumped through a much smaller hose and even upwards for disposal.
This is essentially a garden hose, that you clean or ‘flush’ out your sewer hose with after use. It’s best to have a special hose, that is only for this job. You don’t want the be filling up your paddling pool with a hose that’s just been in your sewer pipe do you?
Whilst you don’t technically need to have the above accessories they will make life easier, and when it comes to dumping the sewer we want things to be as quick and painless as possible.
How to Use an RV Sewer Hose
As this is the worst job you’re going to have to do on your RV trip, you want to do it as quickly as possible. This how to guide will make you look like you’ve been doin this your whole life, so you can quickly move on and enjoy the better parts of RVing.
The good news is that it isn’t that complicated, and once you’ve done it a couple of times you won’t even need to think about it.
Step 1 – Glove up!
First things first, put your latex gloves on. The sewer in your RV is an environmental hazard and you don’t want to be touching it, so to help prevent any accidents make sure you have gloves on.
Step 2 – Close the Sewer Valves.
DO NOT SKIP THIS STEP! Make sure that the RV sewer valve is closed. You don’t want to take the cap off with an open valve, ever.
Step 3 – Attach the Sewer Hose.
Once the valves are off (double check, unless you want a face full), attach the sewer hose to the RV and the other end to the sewer pipe. Check these are securely fastened, or you might get another face full.
Step 4 – Let rip!
When you are sure that the hose is connected securely to both ends, open the sewer (black tank) valve. Open the valve slowly so you can be sure the hoses are secure. Let the tank drain completely, keeping an eye on the hose the whole time to make sure that there isn’t any leakage.
When the black tank is fully drained close that valve and open the grey tank valve, going slowly again. The waste water in the grey tank will help to wash the sewer from the black tank down the drain so make sure that you do this step in order – black tank then grey tank.
When the tanks are drained, turn the valves closed.
Step 5 – Detach the Hose from your RV.
Now all the tanks are emptied you need to detach the hose from the RV, don’t forget to replace the cap.
Step 6 – Clean the hose.
Before you detach your hose from the sewer drain, you’ll want to clean it so there is no lingering debris inside. Get your water hose (non-drinking) and use it to clean out the sewer hose and flush any remaining particles down the drain. Don’t put the water hose inside of the sewer hose!
Step 7 – Detach the hose from the sewer.
Now the sewer hose is as clean as it can be, you can detach it from the sewer end. Don’t forget to replace the cap.
Place the hose in it’s storage place for next time, ideally it will have it’s own box, you don’t want it touching any other equipment.
Follow the steps above and you’ll be disposing sewage like a pro!
Good Luck!
How to Look After Your RV Sewer Hose
The best way to care for your RV septic hose is to make sure that you clean is after every use, if you follow the directions given above you can’t go far wrong. Emptying the grey tank after the black tank and then flushing it out with a water hose is the best way to clean it.
If you want to go the extra mile you can try using some enzyme treatments that will thoroughly clean out your hose.
Make sure that you’ve cleaned it well before storing it away.
How to shorten an RV sewer hose?
The good news is that you can shorten your hose if you find it’s too long. It’s really annoying to lug around a hose that’s too long, it also makes it harder to use. But, you don’t want one that’s too short or you’ll be making a mess!
First rinse and clean out your sewer hose the best you can. Then use a box cutter or similar tool to carefully cut the hose to the desired length.
Use some wire cutters to cut the coil that will be sticking out of the shorter hose.
Then re-attach the bayonet fitting (most common type) by unscrewing it from the old end and screwing onto your new end. Don’t forget the retainer clip, this can be difficult to remove but you will be able to remove and reattach it.
Although sewer hoses now are made with durability in mind, they inevitably won’t last forever. Depending on the damage you might be able to repair it.
If you have a leak in the middle part of the hose you can cut it out and attach a coupler connection.
Instead of shortening a hose it would be a better idea to buy a shorter hose and an extension for it.
Be sure that you want to shorten your RV septic hose before you cut it as there’s no going back.
How to keep RV sewer hose from freezing?
You might find yourself with the unfortunate task of emptying the RV tanks in freezing temperatures. Make sure that the RV hose is not attached to the RV long term – you don’t want the insides to be frozen solid. Keep the hose under cover if possible.
When you do have to connect it to empty the tanks, try to keep it as insulated as possible, you can use heat pads and cover the hose with towels. You can even get a heated wrap for the hose.
It’s a good idea to use an RV antifreeze in your black and grey tanks to stop the valves from freezing and prevent blockages.
How to store RV sewer hose?
You’ll need a storage space that’s specifically for your sewer hose, you don’t want it touching anything else. Your RV hose should be collapsible so it takes up the least space possible.
Ideally you want to store it in it’s own box in a designated area on your RV, whether that’s bumper storage or in the undercarriage.
You want to make sure that any hose you do buy, will fit into the storage space you have available. You don’t want to run the risk of contaminating other areas of your RV, as germs and diseases are easily spread, especially in such a small space.
In a nutshell, keep it away from everything else – especially your drinking hose.
RV Sewer Hose FAQ’s
Camco Revolution vs Rhinoflex: which is better?
Camco is a well known and trusted brand in the RVing world. The Camco Revolution and Camco Rhinoflex are it’s two best selling RV sewer hoses.
Both of these hoses are great and you’ll be happy with either purchase, there are some differences though.
The Rhinoflex offers more length and flexibility, and has the ability to spin 360 degrees. This hose offers tighter connections and easier storage as they are more flexible.
The Revolution on the other hand is more durable and you can rest assured that it will last you a very long time. They are reinforced with a steel wire and are pretty indestructible, they can survive being run over.
Both are great options, it’s up to you which features you value more.
What Is The Best RV Sewer Hose fitting?
If money isn’t an issue then the best fitting is the CAM-Lock connector, they are the most secure fittings available.
The bayonet hook fittings, offer the best value and are still quite secure.
The slip fittings are the cheapest and are secured with a clamp, these can get loose and create an unholy mess if you don’t secure it well enough.
Are RV Sewer Hoses Universal?
Yes most RV sewer hoses are standardized to fit a three inch sewer outlet on most RVs. Don’t forget that the sewer hose is for use with the black tank and grey tank, which usually both come out of the same 3 inch outlet.
RV Sewer Hose Recap
Valterra Dominator RV Sewer Hose – Best Overall
Lippert Waste Master RV Sewer Hose – Best for Easy Installation
Titan 20 Foot Premium RV Sewer Hose Kit – Best for Durability
Camco RhinoEXTREME RV Sewer Hose Kit – Best for Flexibility
Camco Revolution Sewer Hose Kit – Best for Price
Final Thoughts
If there’s one bit of kit for your RV that you don’t want to get wrong it’s the sewer hose – for obvious reasons.
It’s also a good idea to always have a back up sewer hose – just in case.
In our opinion you can’t go far wrong with any of the hoses in our review, but the Valterra Dominator RV Sewer Hose has everything you need in one kit.
Good luck with your sewage endeavours, I hope this article has helped you make sense and stops you having any accidents.